Prometheus 3 on-line user guide


Getting started with the Prometheus 3
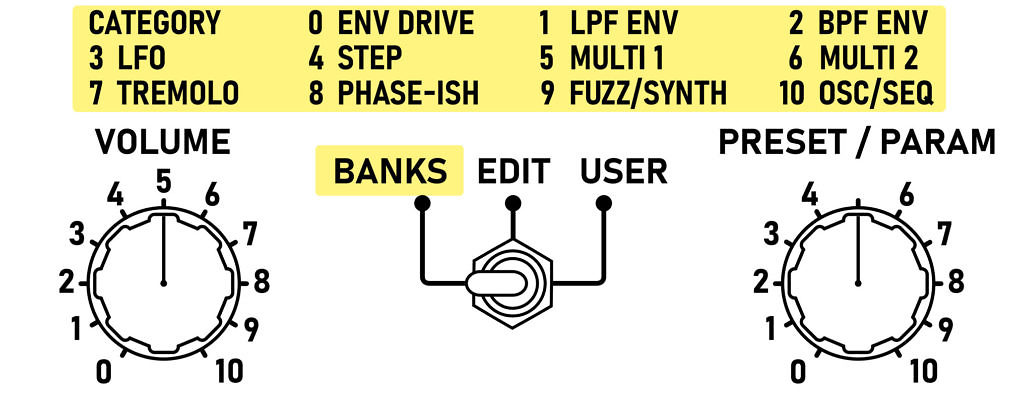
To get a taste of what the Prometheus 3 has on tap, check out the 121 factory presets. Flip the switch to BANKS.
The presets are arranged into eleven categorized banks listed at the top of the pedal.
Banks and factory presets

Selecting Bank Presets
Select the category with the SELECT knob.
Select a preset with the PRESET/PARAM knob.
While in BANKS mode the PARAM R G & B knobs are assigned to parameters specific to each bank.
For example, the envelope filter banks 0-2 let you control the envelope depth, filter resting point and Resonance. In Bank 7 the Param knobs control the tremolo LFO, depth and rate.
Tap switch

Tap tempo
Press the tap switch two or more times to set the tempo.
The Prometheus 3 will remember your tempo even if you switch to different banks for any presets that using LFOs.
To exit tap tempo hold the tap switch for two seconds. In BANK mode only the tremolo bank allows you to adjust the speed manually without going into EDIT mode. We’ll get to that in a moment.
Saving and Recalling a User Preset

Come up with something you like and want to save it?
The Prometheus 3 lets you save 11 user presets. Saving presets is easy.
- flip the switch to edit mode.
- Press the FX bypass switch for two seconds.
- The LED will flash while it’s waiting to save.
- Turn the PRESET/PARAM knob to choose a spot to save your patch.
- Press the bypass switch again. That’s it. Your patch is saved and safe even if the power goes out.
Now any time you want to recall your preset, simply flip the switch to USER mode and select the same spot on the PRESET/PARAM knob.
Editing and Customizing

Edit Mode
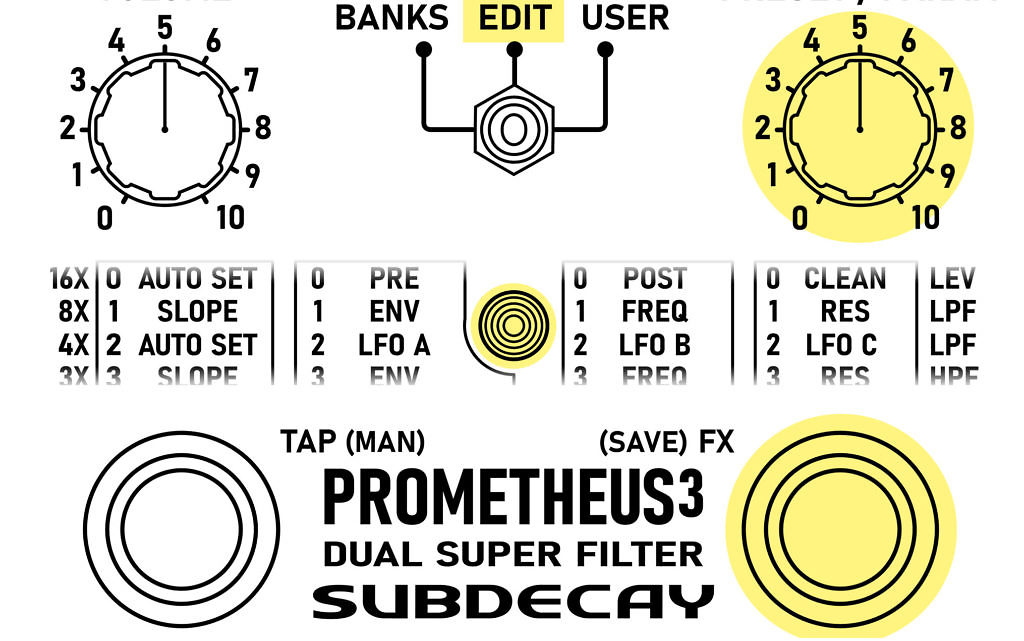
Edit mode lets you access the full 40 parameters.
These parameters are all arranged into rows listed on the edit matrix.

Editing a row
- Set switch set to EDIT mode
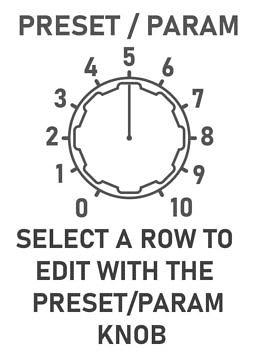
- Use the PRESET/PARAM knob to choose a row to edit.
- Use the SELECT and PARAM R G & B knobs control the parameters listed on the selected row.
The helpful LED.
Notice as you turn the PARAM R G & B knobs the LED sometimes gets brighter?
This you know you’ve returned to the parameter’s original setting setting before editing.

Envelope options


Envelope settings
Set the PRESET/PARAM knob to 1 to edit the LPF envelope filter.
Set the PRESET/PARAM knob to 3 to edit the HPF envelope filter.


While editing either envelope row, the select knob controls the envelope slope.
Slope settings to the left are down envelopes. Settings to the right are up envelopes.
Turn the select knob to 10 for a fast opening envelope.
Choose 9 for a slower attack.
Choose 0 or 1 for fast and slow envelope down.
The rest of the envelopes aren’t in the usual envelope filter bag of tricks.
2 & 3 are pixelated envelope down.
7 & 8 are pixelated envelope up. This is like a sample/hold filter effect, but instead of being shaped from noise it’s shaped by your pick attack.
4 & 6 send envelope speed control to LFO C and the TREM LFO. Using envelope speed control with automatically set LFO C and the tremolo into manual speed control.

PARAM R: Whichever envelope slope you select, turn the PARAM R knob to the right for more or to the left for less.
PARAM G: Controls the resting point of the filter.
PARAM B: Controls filter resonance. If you turn this knob past 8 the filter will self oscillate. (Tame self oscillation with settings on the GATE row)
LFO Levels


LFO level settings
Both the LPF and HPF can be modulated by three separate LFOs.
Choose row 2 to edit LPF modulation levels or row 3 for HPF modulation levels.
PARAM R: modulation amount from LFO A
PARAM G: modulation amount from LFO B
PARAM B: modulation amount from LFO C

Auto set?
Some rows have “AUTO SET” under the select knob? What’s an AUTO SET?
AUTO SETs don’t control their own parameter. Instead they automatically set PARAM R G & B with helpful starting points when editing.
Setting the select knob to 0 returns all LFO levels back to the original settings before you started editing.
Turn the select knob to 1 to set all LFO levels to OFF.
Turning the select knob to the settings generally go from subtle to extreme.
LFO settings


LFO settings
Set the PRESET/PARAM knob to either 5 6 or 7 to edit LFO settings.
PARAM R: Chooses one of the 8 LFO shapes.
The SELECT knob sets the tap tempo ratio. The ratios are listed on the side of the edit matrix from slow to fast. The range is from 16 (0) beats to 32nd notes (10.)
Press the tap switch two or more times to set the tempo.


Warping LFOs
PARAM G warps the LFO shape. Warping first five shapes, sine, triangle, ramp, saw and random is intuitive.
The last three shapes are sequences based on a ramp, saw and triangle wave.
These sequences range from 4 to 32 steps. The PARAM G knob selects the sequence.
Manual speed control
PARAM B sets the speed manually.
This is only active when tap tempo is off, or when envelope speed control is used with LFO C or the Tremolo.
Tremolo

Tremolo settings
Set the PRESET/PARAM knob to either 8 to edit tremolo settings.


PARAM R: Chooses a LFO wave shape. The first five shapes similar to LFO A B & C, but they can not be warped.
The other three LFO shapes are throb, blip and square. Blip has a vintage optical tremolo feel. Blip is based on a warped triangle. Square is a square wave.
The SELECT knob sets the tap tempo ratio just like LFO A B & C. The ratios are listed on the side of the edit matrix from slow to fast. The range is from 16 (0) beats to 32nd notes (10.)
Press the tap switch two or more times to set the tempo.
PARAM G controls the tremolo depth.
Manual speed control
PARAM B sets the speed manually. This is only active when tap tempo is off, or with LFO C or the Tremolo LFO when envelope speed control is engaged.
Gates

Gate settings
The Prometheus 3 filters can self oscillate when the resonance settings are maxed. This pedal also has more gain on tap that most envelope filters. This is where the GATE row comes in handy.

PARAM R: Sets the noise gate threshold. When engaged this will shut off all output from the pedal when you aren’t playing.
LPF and HPF “gates”
Taming oscillation, but don’t want the output to fully cut off when things get subtle? Instead of the noise gate you can use the LPF and HPF limit parameters. Instead of cutting the output they limit the filter resonance when the input drops below the threshold.
PARAM G: Sets the threshold for the LPF limit.
PARAM B: Sets the threshold for the HPF limit.
Customize the LED color for your preset.

LED controls
The Prometheus 3 lets you customize the LED color for each user preset. Why? Why not?
This can be super helpful when bypassed. The LED will light up momentarily to let you know you’ve got the right preset loaded.
PARAM R: Controls the red brightness.
PARAM G: Controls the green brightness.
PARAM B: Controls the blue brightness.
Additionally, the select knob has AUTO SETS to select from predefined settings.
Assigning controls for user presets.

Two ways to customize controls for user presets.
By default user presets leave the Param R G & B knobs unassigned. This can be useful in case you accidentally touch one of the knobs with your foot while turning the effect on and off.
If you prefer there are two ways to assign controls to each knob.
1. Directly assign the PARAM R G & B knobs to any matrix parameter from the R G or B column. This takes a little longer, but is more flexible and intuitive.
2. Copy the controls from category preset banks to the PARAM R G & B knobs. This is easier to set up and allows some knobs to control multiple parameters, but is less flexible.

Directly assign PARAM knobs.
- While in edit mode hold the FX(save) switch down to save the patch.
- Instead of pressing the FX switch again press the TAP switch.
- The LED will flash red letting you know you can assign the PARAM R knob.
- Assign PARAM R by choosing a Row with the PARAM/PRESET knob AND then turning a PARAM R G or B knob to the corresponding parameter.
- The LED will turn solid red letting you know a parameter has been assigned.
- Press the TAP switch. This will take you to the next knob assignment. Repeat the same process for the PARAM G and B knobs.
- After all three knobs are assigned the pedal goes back to save process. Chose a preset number with the PRESET/PARAM knob and press the FX switch to save.

Copy category preset controls
Most of the category preset controls do not directly control the full range of a parameter.
Instead most use offset values or ratios, especially if a knob controls multiple parameters. For example for category 6 the Param R knob controls all LFO depths. Turning the Param R knob will increase each LFO depth as a percentage from the patch’s saved settings. The percentage range is from 0% to 125%
Other category preset controls are based on offsets. For example many have the Param G knob assigned to the LPF and HPF cutoff frequency. If the LFP cutoff setting is at 75% and the HPF cutoff is 25%. Turning the PARAM G knob will change the cutoff settings of both filters, but they will maintain a 50 point difference.
- While in edit mode hold the FX(save) switch down to save the patch.
- Turn the SELECT knob to the category controls.
- The LED will pulse all colors at once to let you know you’ve assigned a control scheme.
- Finish saving the patch as you normally would by choosing a preset number with the PRESET/PARAM knob and pressing the FX switch again.
Parameter assignments shown in the chart below.

Setup and factory reset.
Factory Reset and startup options
To access global settings you’ll need to use setup mode. Any changes require the pedal to be un-powered then powered back up.
To use Setup Mode follow these steps and see the table to the right —————————–>>>>>
- Set the toggle switch to EDIT.
- Set the PRESET/PARAM knob to 10 & the VOLUME knob to 0.
- Hold the TAP switch for two seconds. After releasing the switch the LED will pulse.
- Use the PRESET/PARAM knob to select a setting.
- The color and number of LED pulses confirms the selection.
- For some settings the volume knob is used to edit the setting.
- To record the setting press the bypass switch, or Exit setup by changing the toggle switch out of EDIT mode.
For options 7 8 & 9 these only affect the 121 presets in bank mode. These options allow compensation for different guitars and their signal levels.
| Preset/Param knob | LED Flash | Setting/Action |
|---|---|---|
| 0 | Red 5X | Factory reset |
| 1 | Red 2X | N/A |
| 2 | Red 2X | N/A |
| 3 | Red 2X | N/A |
| 4 | Blue 2X | Reserved |
| 5 | Blue 3X | Restore global settings |
| 6 | Green 2X | Set suboctave filter with volume knob. |
| 7 | Green 3X | Set Bank mode pre-filter level adjust with volume knob. |
| 8 | Green 4X | Set Bank mode volume level adjust with volume knob. |
| 9 | Green 5X | Set Bank mode envelope level adjust with volume knob. |
| 10 | Red 2X | N/A |