There is now a printable PDF version available here. You’ll find midi implementation data there as well.

Getting started with the Noise Theory Parallel Waveshaper Fuzz
The Noise Theory offers more options than your typical fuzz pedal, including multiple fuzz types, MIDI control, parallel signal routing and more. This page will help you get a handle on everything.
A quick note: The EDIT MODE switch plays a key role in the pedal’s operation and available controls. To start set the EDIT MODE switch to PRESETS. (top position)
An Overview:
Introduction | Inputs, Outputs & Control Surface
Controls
-PRESETS
-ANALOG FUZZ
-SHAPER FUZZ
-PRE-FUZZ
MIDI Implementation
Inputs, outputs and controls.
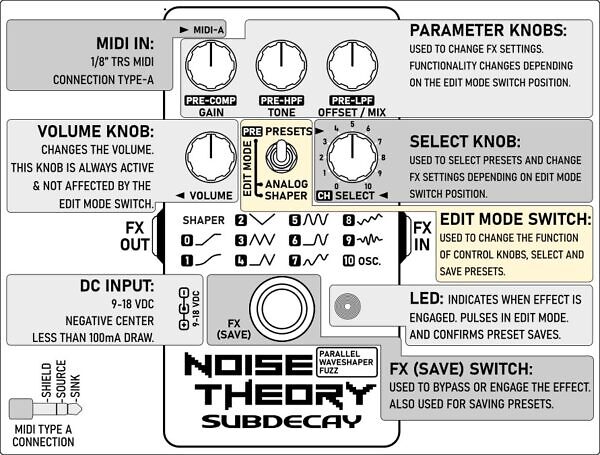
Noise Theory control surface, connections, MIDI.
Much of this likely looks familiar.
Top left you’ll see the MIDI input. This uses a 1/8″ TRS type A MIDI connector. You may need an adapter which is not included.
To get started
- set the EDIT MODE switch to PRESETS.
- Connect the pedal to your guitar, amp and power.
- When powering up the LED will flash 5 times. Wait for flashing to stop (~2 seconds)
- Press the bypass switch to engage the effect. The LED will turn on.
- Use the SELECT knob to try the stock presets.
To edit settings change the EDIT MODE switch position. Once the EDIT MODE position is set to ANALOG or SHAPER the LED will begin to pulse. This indicates edit mode is active. Edit mode will remain active until you return the switch to PRESETS and press the bypass switch.
EDIT MODE SWITCH : SHAPER
LED flashes while edit mode is engaged.
While the EDIT MODE switch is set to SHAPER the LED will pulse continuously while the effect is engaged.
The pulsing LED indicates edit mode is active. While set to SHAPER the knobs control the following parameters:
GAIN: Controls the overall gain of the waveshaper fuzz.
TONE: Cuts treble as the knob is turned to the left.
OFFSET: For most fuzz types this controls the bias or offset voltage of the fuzz.
SELECT: Selects the WaveShaper fuzz type. Fuzz 0 and 1 are based on simple signal compression/clipping. Fuzz 2-9 are based on wave folding. Fuzz 10 is an oscillator fuzz.
Edit mode will remain active until the EDIT MODE switch is set to the PRESET & the pedal is bypassed.


EDIT MODE SWITCH: ANALOG
LED flashes while edit mode is engaged
While the EDIT MODE switch is set to ANALOG the LED will pulse continuously while the effect is engaged.
The pulsing LED indicates edit mode is active. While set to ANALOG the knobs control the following parameters:
GAIN: Controls the overall gain of the analog fuzz
TONE: Cuts treble as the knob is turned to the left.
MIX: Turn to the right for maximum analog fuzz mix. Turn to the left for maximum WaveShaper fuzz mix.
SELECT: N/A
Unlike the Shaper Fuzzes the ANALOG fuzz only has one type. The SELECT knob is disabled while the EDIT MODE switch is set to ANALOG.
The ANALOG fuzz was included because some of the SHAPER fuzzes can produce and overload of intermodulation and harmonics. Some settings will also cut bass frequencies. Mixing in some ANALOG fuzz can help keep the chaos in check.
Edit mode will remain active until the EDIT MODE switch is set to the PRESET & the pedal is bypassed.
PRE-FUZZ CONTROLS AND CHORUS
LED flashes while edit mode is engaged
After initiating edit mode setting the EDIT MODE switch back to top position edit mode remains engaged. This lets you access the PRE-fuzz settings and
The pulsing LED indicates edit mode is active. While set to (PRE) the knobs control the following parameters:
PRE-COMP: Controls pre-fuzz compression.
PRE-HPF: Turn the knob right to cut pre-fuzz low frequencies.
PRE-LPF: Turn the knob left to cut pre-fuzz high frequencies.
The pre-fuzz controls are especially helpful with the wave folder fuzz types.
SELECT: Choose a chorus/flange effect by selecting 1-10. To turn off the chorus/flange effect select 0.
*** The chorus/flange effect has 10 internal parameters. These can be changed via midi in real time, but only the chorus/flange effects from the SELECT knob can be saved to a preset***
PRE-FUZZ CONTROLS AND CHORUS
Saving a user preset
Deactivating edit mode: If edit mode is active and the EDIT MODE switch is set to PRESET, simply bypassing the pedal with the FX switch will deactivate edit mode. Whatever changes you have made will persist until a new preset is chosen with the SELECT KNOB.
Saving: When the EDIT MODE switch is in the PRESET position you can save a preset at any time.
- EDIT MODE switch set to PRESET.
- Hold the FX(SAVE) for two seconds.
- The LED will flash.
- Use the SELECT knob to choose a save location. (0-10)
- Press the FX(SAVE) switch again to save the preset.
Now, whenever edit mode is deactivated you can recall your preset with the SELECT knob.
All settings and all previous steps can also be accomplished via MIDI. See the MIDI info at the bottom of the page.
Setup Mode: Factory Reset and startup options
Setup mode is used to change global parameters like the MIDI channel or initiate a factory reset.
When powering up the pedal the LED will flash 5 times. Access setup mode by pressing the FX(SAVE) switch while the LED is flashing.
Options are chosen with the select knob.
The LED will display a series of flashes to confirm the option selected.
To use Setup Mode follow these steps and see the table to the right —————————–>>>>>
- Power up the pedal.
- Press the FX(SAVE) switch while the LED flashes.
- Choose an action with the select knob.
- The LED will display one long flash followed by a series of short flashes to confirm your selection.
- Press the FX(SAVE) switch again to initiate the action
- To change the MIDI channel (action 8&9) there is an additional step.
| Select knob | Long | Short | Short | Action |
|---|---|---|---|---|
| 0 | 1X | 2X | 1X | Factory reset. |
| 1 | 1X | 2X | 2X | Restore factory fuzz presets. |
| 2 | 1X | 2X | 3X | Restore factory synth presets. |
| 3 | 1X | 2X | 4X | Reset startup options. MIDI CH1, MIDI not activates synth. |
| 4 | 1X | 3X | 1X | Used for troubleshooting via serial connection. |
| 5 | 1X | 3X | 2X | Reserved. |
| 6 | 1X | 3X | 3X | MIDI note activates synth. |
| 7 | 1X | 3X | 4X | Only CC 115 activates synth. |
| 8 | 1X | 4X | 1X | Set MIDI chan 1-11 |
| 9 | 1X | 4X | 2X | Set MIDI chan 12-16 |
| 10 | 1X | 1X | 1X | EXIT SETUP |
Changing the MIDI channel:
The Default MIDI channel is channel 1. Use action 8 in setup mode if you want to use MIDI channel 1-11. Use action 9 if you want to use MIDI channel 12-16. Press the FX(SAVE) switch. Use the select knob to choose the MIDI channel.
Action 8 – Set MIDI channel 1-11
| SELECT KNOB | MIDI CHAN | SELECT KNOB | MIDI CHAN |
|---|---|---|---|
| select 0 | channel 1 | select 6 | channel 7 |
| select 1 | channel 2 | select 7 | channel 8 |
| select 2 | channel 3 | select 8 | channel 9 |
| select 3 | channel 4 | select 9 | channel 10 |
| select 4 | channel 5 | select 10 | channel 11 |
| select 5 | channel 6 |
Action 9 – Set MIDI channel 12-16
| SELECT KNOB | MIDI CHAN | SELECT KNOB | MIDI CHAN |
|---|---|---|---|
| select 0 | channel 12 | select 6 | channel 16 |
| select 1 | channel 13 | select 7 | channel 16 |
| select 2 | channel 14 | select 8 | channel 16 |
| select 3 | channel 15 | select 9 | channel 16 |
| select 4 | channel 16 | select 10 | channel 16 |
| select 5 | channel 16 |