M3000 MIDI editor.
- There is a full MIDI CC list in the comprehensive user guide.
- The MIDI editor should work in Chrome & Firefox. It can also be downloaded and run off line if necessary.
- While using the MIDI editor the M3000’s EDIT MODE switch should be set to PRESETS.
It will work in EZ or DEEP mode, but may cause issues with custom knob assignments.
Continue to the MIDI EDITOR
Additional HELP!
If you are having trouble getting things working or aren’t used to working with MIDI the information below may be useful.
![]()
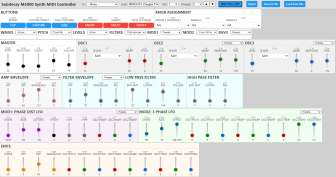
MIDI Setup: Choose your MIDI interface in the MIDI out menu. Use MIDI channel 1 unless you have changed the MIDI channel of the M3000.
If want to use a MIDI controller select the MIDI port it’s connected to in MIDI in. If you use a MIDI controller to edit settings they will update on screen.
USING A MIDI CONTROLLER AS A MIDI INTERFACE: Your mileage may vary.
Using a MIDI controller as your MIDI interface (connecting the M3000 to the MIDI controller’s MIDI out) turn MIDI Thru off.
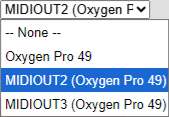
Some MIDI controllers have non-intuitive names for their outputs. For example, the Oxygen Pro’s 5-pin MIDI output is MIDIOUT2. This is on page 110 of the Oxygen Pro manual and is listed incorrectly. It’s often easier just to try them all until you find the one that works.
MIDI controllers often have extensive options for what data is sent to the MIDI out port. Some AKAI MIDI controllers disable their hardware MIDI output if USB MIDI out is enabled.
![]()
Saving and Matching Presets to Your Computer
The “Save to File” button saves the settings currently displayed on the screen. If a control hasn’t been adjusted, its value on screen may be different from the setting stored in the pedal itself. To make sure the on-screen settings and the M3000’s settings match follow these steps.
Step 1: Send all On-Screen controls to the M3000. Choose one of these methods to make sure the on-screen settings match the pedal’s actual state
Use the ‘Reset’ Button: Clicking Reset sends a basic, initialized synth patch to the M3000. This updates all on-screen parameters to match the pedal, giving you a clean starting point.
OR
Load a Previous Preset: Click Load from File to open a previously saved preset. This will send all of that preset’s settings to the pedal, immediately synchronizing the on-screen controls with the M3000.
Step 2: Use the MIDI editor to create a sound.
Step 3: When you’ve come up with something you like, click Save to File to store the complete preset on your computer.
![]()
Select a Preset: Preset 0 – 23 are user presets. 0-10 can be recalled via the select knob in preset mode. 11-23 can only be recalled using MIDI.
Any presets from 23-127 will load factory presets.

BYPASS bypasses the effect or engage the effect.
CAPTURE PRESET Prepares parameter data to be saved to a preset. (Times out after 10 seconds)
SAVE CAPTURED Saves preset to most recent preset selected either by the select knob or the preset drop down menu.
MIDI SYNTH Enable or disable the MIDI synthesizer.
LEGATO Turn off or on. Only works with the MIDI synth.
NOTE LFO RESET Each new attack or note will retrigger the LFO. This is especially useful if using MOD2 for arpeggiator like effects.

Knob Assignments: Each preset can have custom assigned controls. These will only work if the M3000’s edit switch is set to PRESETS.
![]()
SECTION PRESETS: Each dropdown has presets for multiple settings. This is useful for creating quick presets or starting points.
 MASTER: These are typical settings you’ll use and adjust in necessary.
PORT: controls portamento. Even if you don’t want an audible gliding effect from note to note you’ll probably want to keep it set to 20 as a minimum as it helps stabilize tracking.
BEND RANGE: sets the range of the MIDI controller’s pitch wheel. Normally you’d only use this in MIDI synth mode, but it will work with guitar too.
CLEAN: Sets the clean signal output. This runs hot enough that it will overdrive when set to maximum.
SENSE: Typically you’ll want this set around 63. Any following input sensitive parameters like overall sustain, tracking cutoff and envelopes will be affected.
 ENVELOPES: The AMP envelope controls the VCA or the amplitude of the synth effect. While used as a guitar synth
RANGE: controls the input to the envelope follower. Typically you’ll want to keep the Range set around 63. If 63 doesn’t seem like enough AND SENSE is set to 63 or higher you may need to increase the input gain SETUP OPTIONS. See page 12 in the comprehensive user guide and choose option 6.
ATTACK & DECAY: For a quick attack keep ATT set to 0. Typically you’ll want to keep decay set around 32 and adjust to taste.
RELEASE: Often you’ll want to leave this at 0, but if you want notes to trail off after a note is muted set it around 24 or higher.
When the M3000 is used as a MIDI synthesizer envelopes will operate like a typical ADSR.
FILTER SECTION:

Like the Amp Envelope the Filter envelope uses the RANGE control to set the input gain to the envelope follower. Additionally both filters have their own ENVELOPE AMOUNT control.